车道线检测原理与实现示例
车道线检测原理
车道线检测是自动驾驶和驾驶辅助系统中的关键任务之一。OpenCV是一个广泛使用的计算机视觉库,可以用来进行车道线检测。
车道线检测的基本原理是通过图像处理和计算机视觉技术在图像或视频帧中提取出车道线的位置信息。以下是一种常见的基于OpenCV的车道线检测方法:
1.图像预处理:首先,将彩色图像转换为灰度图像,可以使用OpenCV中的cvtColor函数来实现。灰度图像有利于减少计算量并突出车道线的特征。
2.边缘检测:利用Canny边缘检测算法,可以通过OpenCV的Canny函数来实现。Canny算法能够检测图像中的边缘,并输出一个二值图像,其中只包含边缘点。
3.区域兴趣提取ROI:车道线通常在图像的下半部分出现,因此需要定义一个感兴趣的区域来提取车道线。可以通过OpenCV的fillPoly函数创建一个多边形mask,将非感兴趣区域的像素设为0。
4.霍夫变换:使用霍夫变换来检测直线,可以通过OpenCV的HoughLinesP函数实现。霍夫变换将图像中的直线表示为参数空间中的点,通过对参数空间进行累加,可以找到足够长的直线。
5.直线拟合:通过拟合检测到的直线,可以得到车道线的位置和方向。可以使用最小二乘法或RANSAC等算法来拟合直线,OpenCV提供了fitLine函数来实现。
6.可视化:将检测到的车道线在原始图像上进行可视化,可以使用OpenCV的line函数来绘制检测到的直线。
最终,可以采用OpenCV读取视频,进行灰度化处理,然后用canny算子进行边缘检测,分析轮廓,然后进行直线拟合处理,最后对直线添加权重分析,得到最终的车道线检测结果。
图片读取
一个示例:
#include <opencv2/opencv.hpp>
#include <iostream>

using namespace std;
using namespace cv;

int main()
{
    // 读取图像
    Mat image = imread("input.png");

    // 图像预处理
    Mat gray;
    cvtColor(image, gray, COLOR_BGR2GRAY);
    GaussianBlur(gray, gray, Size(5, 5), 0);

    // 边缘检测
    Mat edges;
    Canny(gray, edges, 50, 150);

    // 区域兴趣提取
    Mat mask = Mat::zeros(edges.size(), CV_8UC1);
    Point points[4] = {
        Point(100, image.rows),
        Point(400, 350),
        Point(600, 350),
        Point(image.cols - 100, image.rows)
    };
    fillConvexPoly(mask, points, 4, Scalar(255));
    bitwise_and(edges, mask, edges);

    // 霍夫变换
    std::vector<Vec2f> lines;
    HoughLines(edges, lines, 1, CV_PI / 180, 100);
    cout << "霍夫变换" << endl;

    // 直线拟合和可视化
    for (size_t i = 0; i < lines.size(); i++)
    {
        float rho = lines[i][0];
        float theta = lines[i][1];

        double a = cos(theta);
        double b = sin(theta);

        double x0 = a * rho;
        double y0 = b * rho;

        Point pt1(cvRound(x0 + 1000 * (-b)), cvRound(y0 + 1000 * (a)));
        Point pt2(cvRound(x0 - 1000 * (-b)), cvRound(y0 - 1000 * (a)));

        line(image, pt1, pt2, Scalar(0, 0, 255), 3);
    }
    cout << "直线拟合" << lines.size() << endl;

    // 显示结果
    imshow("Lane Detection", image);
    waitKey(0);

    return 0;
}
编译运行:
g++ main.cpp -o main `pkg-config --libs opencv` && ./main
视频读取
添加好opencv相关依赖后,写入:
//opencv454学习
#include <iostream>
#include <cmath>
#include <opencv2/opencv.hpp>
using namespace cv;
using namespace std;
/**
**边缘检测+霍夫变换方法
**1、视频读取
**2、二值化
**3、轮廓分析
**4、直线拟合
**5、添加权重
*/
Point left_line[2];
Point right_line[2];
void process(Mat &frame, Point *left_line, Point *right_line);
Mat fitLines(Mat &image, Point *left_line, Point *right_line);
int main(int argc, char** argv) {
//读取视频
VideoCapture capture("test.avi");
int height = capture.get(CAP_PROP_FRAME_HEIGHT);
int width = capture.get(CAP_PROP_FRAME_WIDTH);
int count = capture.get(CAP_PROP_FRAME_COUNT);
int fps = capture.get(CAP_PROP_FPS);
//初始化
left_line[0] = Point(0, 0);
left_line[1] = Point(0, 0);
right_line[0] = Point(0, 0);
right_line[1] = Point(0, 0);
cout << height << " " << width << " " << count << " " << fps << endl;
//循环读取视频
Mat frame;
while (true) {
int ret = capture.read(frame);
if (!ret) {
break;
}
//imshow("input", frame); //显示视频
process(frame, left_line, right_line); //调用process
char c = waitKey(5);
if (c == 27) {
break;
}
}
}
// 图像处理(参数:视频、左车道、右车道)
void process(Mat &frame, Point *left_line, Point *right_line) {
Mat gray, binary;
/**灰度化*/
cvtColor(frame, gray, COLOR_BGR2GRAY);
//canny算子边缘检测
Canny(gray, binary, 150, 300);
//imshow("Canny", binary);
for (size_t i = 0; i < (gray.rows / 2 + 40); i++) {
for (size_t j = 0; j < gray.cols; j++)
{
binary.at<uchar>(i, j) = 0;
}
}
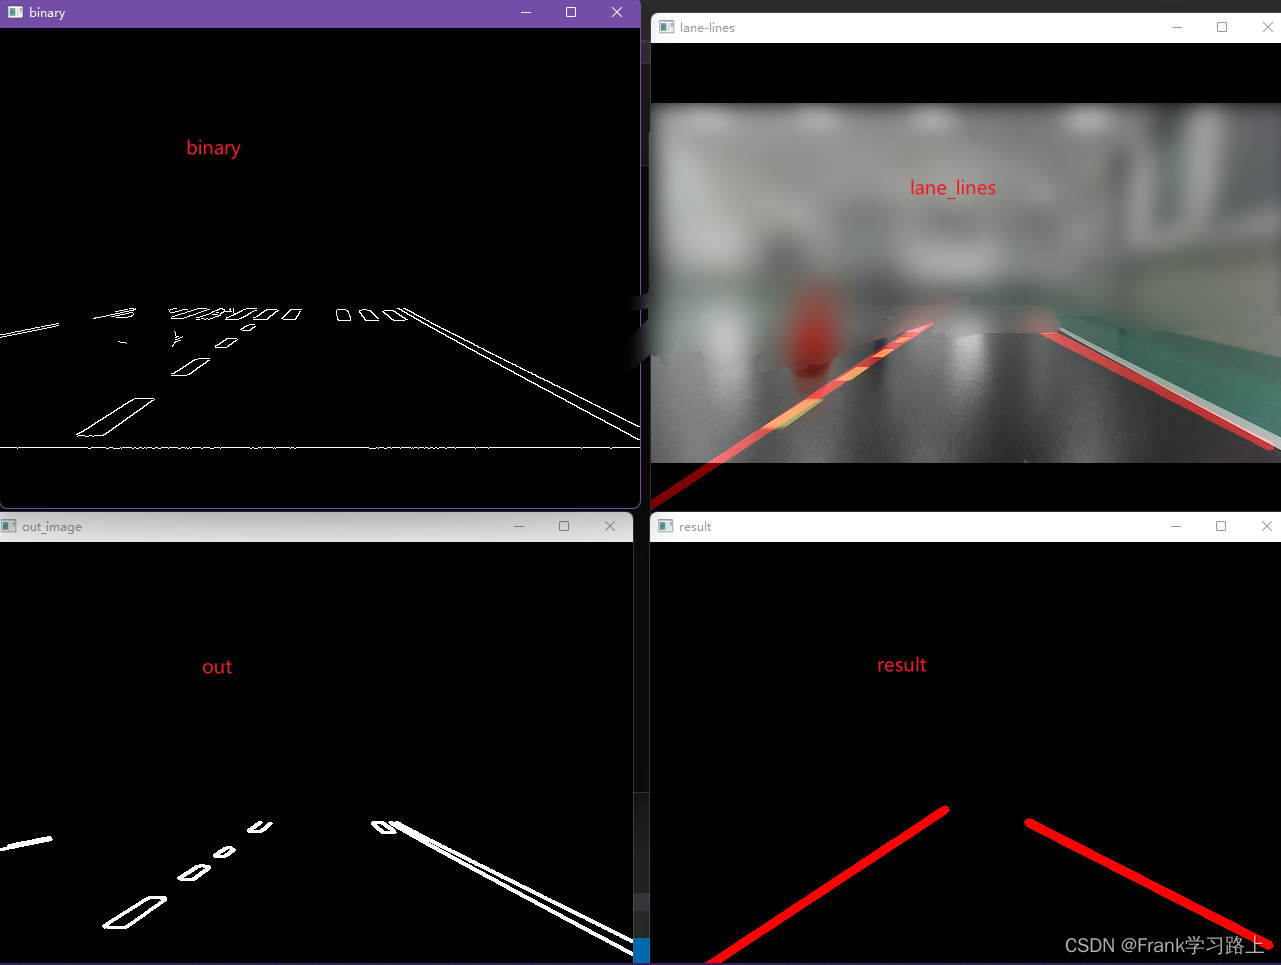
imshow("binary", binary); //显示二值化结果
//寻找轮廓
vector<vector<Point>> contours;
findContours(binary, contours, RETR_EXTERNAL, CHAIN_APPROX_SIMPLE);
Mat out_image = Mat::zeros(gray.size(), gray.type());
for (int i = 0; i < contours.size(); i++)
{
//计算面积与周长
double length = arcLength(contours[i], true);
double area = contourArea(contours[i]);
//cout << "周长 length:" << length << endl;
//cout << "面积 area:" << area << endl;
//外部矩形边界
Rect rect = boundingRect(contours[i]);
int h = gray.rows - 50;
//轮廓分析
if (length < 5.0 || area < 10.0) {
continue;
}
if (rect.y > h) {
continue;
}
//最小包围矩形
RotatedRect rrt = minAreaRect(contours[i]);
//角度问题:https://blog.csdn.net/weixin_41887615/article/details/91411086
//cout << "最小包围矩形 angle:" << rrt.angle << endl;
double angle = abs(rrt.angle);
//angle < 50.0 || angle>89.0
if (angle < 20.0 || angle>84.0) {
continue;
}
if (contours[i].size() > 5) {
//用椭圆拟合
RotatedRect errt = fitEllipse(contours[i]);
//cout << "用椭圆拟合err.angle:" << errt.angle << endl;
if ((errt.angle < 5.0) || (errt.angle > 160.0))
{
if (80.0 < errt.angle && errt.angle < 100.0) {
continue;
}
}
}
//cout << "开始绘制:" << endl;
drawContours(out_image, contours, i, Scalar(255), 2, 8);
imshow("out_image", out_image); //显示轮廓处理后的结果
}
Mat result = fitLines(out_image, left_line, right_line);
imshow("result", result); //显示fitlines直线拟合后的结果
Mat dst;
addWeighted(frame, 0.8, result, 0.5, 0, dst); //权重
imshow("lane-lines", dst); //显示添加权重后的结果
}
//直线拟合处理
Mat fitLines(Mat &image, Point *left_line, Point *right_line) {
int height = image.rows;
int width = image.cols;
Mat out = Mat::zeros(image.size(), CV_8UC3);
int cx = width / 2;
int cy = height / 2;
vector<Point> left_pts;
vector<Point> right_pts;
Vec4f left;
for (int i = 100; i < (cx - 10); i++)
{
for (int j = cy; j < height; j++)
{
int pv = image.at<uchar>(j, i);
if (pv == 255)
{
left_pts.push_back(Point(i, j));
}
}
}
for (int i = cx; i < (width - 20); i++)
{
for (int j = cy; j < height; j++)
{
int pv = image.at<uchar>(j, i);
if (pv == 255)
{
right_pts.push_back(Point(i, j));
}
}
}
if (left_pts.size() > 2)
{
fitLine(left_pts, left, DIST_L1, 0, 0.01, 0.01);
double k1 = left[1] / left[0];
double step = left[3] - k1 * left[2];
int x1 = int((height - step) / k1);
int y2 = int((cx - 25)*k1 + step);
Point left_spot_1 = Point(x1, height);
Point left_spot_end = Point((cx - 25), y2);
line(out, left_spot_1, left_spot_end, Scalar(0, 0, 255), 8, 8, 0);
left_line[0] = left_spot_1;
left_line[1] = left_spot_end;
}
else
{
line(out, left_line[0], left_line[1], Scalar(0, 0, 255), 8, 8, 0);
}
if (right_pts.size() > 2)
{
Point spot_1 = right_pts[0];
Point spot_end = right_pts[right_pts.size() - 1];
int x1 = spot_1.x;
int y1 = spot_1.y;
int x2 = spot_end.x;
int y2 = spot_end.y;
line(out, spot_1, spot_end, Scalar(0, 0, 255), 8, 8, 0);
right_line[0] = spot_1;
right_line[1] = spot_end;
}
else
{
line(out, right_line[0], right_line[1], Scalar(0, 0, 255), 8, 8, 0);
}
return out;
}
运行结果如下:

以上。